Search This Blog


Android – Broadcast Receivers


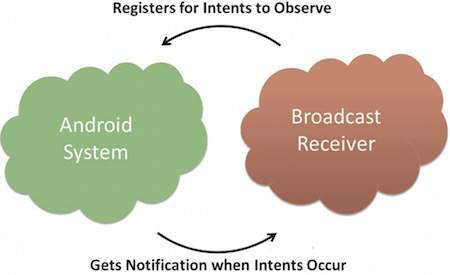
Broadcast Receivers simply respond to broadcast messages from other applications or from the system itself. These messages are sometime called events or intents. For example, applications can also initiate broadcasts to let other applications know that some data has been downloaded to the device and is available for them to use, so this is broadcast receiver who will intercept this communication and will initiate appropriate action.

There are following two important steps to make BroadcastReceiver works for the system broadcasted intents −

  • Creating the Broadcast Receiver.
  • Registering Broadcast Receiver

There is one additional steps in case you are going to implement your custom intents then you will have to create and broadcast those intents.

Creating the Broadcast Receiver

A broadcast receiver is implemented as a subclass of BroadcastReceiver class and overriding the onReceive() method where each message is received as a Intent object parameter.

public class MyReceiver extends BroadcastReceiver {
   @Override
   public void onReceive(Context context, Intent intent) {
      Toast.makeText(context, "Intent Detected.", Toast.LENGTH_LONG).show();
   }
}

Registering Broadcast Receiver

An application listens for specific broadcast intents by registering a broadcast receiver in AndroidManifest.xml file. Consider we are going to register MyReceiver for system generated event ACTION_BOOT_COMPLETED which is fired by the system once the Android system has completed the boot process.

broadcast

Broadcast-Receiver

<application
   android:icon="@drawable/ic_launcher"
   android:label="@string/app_name"
   android:theme="@style/AppTheme" >
   <receiver android:name="MyReceiver">
   
      <intent-filter>
         <action android:name="android.intent.action.BOOT_COMPLETED">
         </action>
      </intent-filter>
   
   </receiver>
</application>

Now whenever your Android device gets booted, it will be intercepted by BroadcastReceiver MyReceiver and implemented logic inside onReceive() will be executed.

There are several system generated events defined as final static fields in the Intent class. The following table lists a few important system events.

Sr.NoEvent Constant & Description
1android.intent.action.BATTERY_CHANGED

Sticky broadcast containing the charging state, level, and other information about the battery.

2android.intent.action.BATTERY_LOW

Indicates low battery condition on the device.

3android.intent.action.BATTERY_OKAY

Indicates the battery is now okay after being low.

4android.intent.action.BOOT_COMPLETED

This is broadcast once, after the system has finished booting.

5android.intent.action.BUG_REPORT

Show activity for reporting a bug.

6android.intent.action.CALL

Perform a call to someone specified by the data.

7android.intent.action.CALL_BUTTON

The user pressed the “call” button to go to the dialer or other appropriate UI for placing a call.

8android.intent.action.DATE_CHANGED

The date has changed.

9android.intent.action.REBOOT

Have the device reboot.

Broadcasting Custom Intents

If you want your application itself should generate and send custom intents then you will have to create and send those intents by using the sendBroadcast() method inside your activity class. If you use the sendStickyBroadcast(Intent) method, the Intent is sticky, meaning the Intent you are sending stays around after the broadcast is complete.

public void broadcastIntent(View view) {
   Intent intent = new Intent();
   intent.setAction("com.tutorialspoint.CUSTOM_INTENT");
   sendBroadcast(intent);
}

This intent com.tutorialspoint.CUSTOM_INTENT can also be registered in similar way as we have regsitered system generated intent.

<application
   android:icon="@drawable/ic_launcher"
   android:label="@string/app_name"
   android:theme="@style/AppTheme" >
   <receiver android:name="MyReceiver">
   
      <intent-filter>
         <action android:name="com.tutorialspoint.CUSTOM_INTENT">
         </action>
      </intent-filter>
   
   </receiver>
</application>

Example

This example will explain you how to create BroadcastReceiver to intercept custom intent. Once you are familiar with custom intent, then you can program your application to intercept system generated intents. So let’s follow the following steps to modify the Android application we created in Hello World Example chapter −

StepDescription
1You will use Android studio to create an Android application and name it as My Application under a package com.example.tutorialspoint7.myapplication as explained in the Hello World Example chapter.
2Modify main activity file MainActivity.java to add broadcastIntent() method.
3Create a new java file called MyReceiver.java under the package com.example.tutorialspoint7.myapplication to define a BroadcastReceiver.
4An application can handle one or more custom and system intents without any restrictions. Every intent you want to intercept must be registered in your AndroidManifest.xml file using <receiver…/> tag
5Modify the default content of res/layout/activity_main.xml file to include a button to broadcast intent.
6No need to modify the string file, Android studio take care of string.xml file.
7Run the application to launch Android emulator and verify the result of the changes done in the application.

Following is the content of the modified main activity file MainActivity.java. This file can include each of the fundamental life cycle methods. We have added broadcastIntent() method to broadcast a custom intent.

package com.example.tutorialspoint7.myapplication;

import android.app.Activity;
import android.content.Intent;
import android.os.Bundle;
import android.view.View;

public class MainActivity extends Activity {

   /** Called when the activity is first created. */
   @Override
   
   public void onCreate(Bundle savedInstanceState) {
      super.onCreate(savedInstanceState);
      setContentView(R.layout.activity_main);
   }


   // broadcast a custom intent.
      
   public void broadcastIntent(View view){
      Intent intent = new Intent();
      intent.setAction("com.tutorialspoint.CUSTOM_INTENT"); sendBroadcast(intent);
   }
}

Following is the content of MyReceiver.java:

package com.example.tutorialspoint7.myapplication;

import android.content.BroadcastReceiver;
import android.content.Context;
import android.content.Intent;
import android.widget.Toast;

/**
 * Created by TutorialsPoint7 on 8/23/2016.
 */
public class MyReceiver extends BroadcastReceiver{
   @Override
   public void onReceive(Context context, Intent intent) {
      Toast.makeText(context, "Intent Detected.", Toast.LENGTH_LONG).show();
   }
}

Following will the modified content of AndroidManifest.xml file. Here we have added <receiver…/> tag to include our service:

<?xml version="1.0" encoding="utf-8"?>
<manifest xmlns:android="http://schemas.android.com/apk/res/android"
   package="com.example.tutorialspoint7.myapplication">

   <application
      android:allowBackup="true"
      android:icon="@mipmap/ic_launcher"
      android:label="@string/app_name"
      android:supportsRtl="true"
      android:theme="@style/AppTheme">
		
      <activity android:name=".MainActivity">
         <intent-filter>
            <action android:name="android.intent.action.MAIN" />

            <category android:name="android.intent.category.LAUNCHER" />
         </intent-filter>
      </activity>
   
      <receiver android:name="MyReceiver">
         <intent-filter>
            <action android:name="com.tutorialspoint.CUSTOM_INTENT">
            </action>
         </intent-filter>

      </receiver>
   </application>

</manifest>

Following will be the content of res/layout/activity_main.xml file to include a button to broadcast our custom intent −

<RelativeLayout 
   xmlns:android="http://schemas.android.com/apk/res/android"
   xmlns:tools="http://schemas.android.com/tools" 
   android:layout_width="match_parent"
   android:layout_height="match_parent" 
   android:paddingLeft="@dimen/activity_horizontal_margin"
   android:paddingRight="@dimen/activity_horizontal_margin"
   android:paddingTop="@dimen/activity_vertical_margin"
   android:paddingBottom="@dimen/activity_vertical_margin" 
   tools:context=".MainActivity">
   
   <TextView
      android:id="@+id/textView1"
      android:layout_width="wrap_content"
      android:layout_height="wrap_content"
      android:text="Example of Broadcast"
      android:layout_alignParentTop="true"
      android:layout_centerHorizontal="true"
      android:textSize="30dp" />
      
   <TextView
      android:id="@+id/textView2"
      android:layout_width="wrap_content"
      android:layout_height="wrap_content"
      android:text="Tutorials point "
      android:textColor="#ff87ff09"
      android:textSize="30dp"
      android:layout_above="@+id/imageButton"
      android:layout_centerHorizontal="true"
      android:layout_marginBottom="40dp" />
      
   <ImageButton
      android:layout_width="wrap_content"
      android:layout_height="wrap_content"
      android:id="@+id/imageButton"
      android:src="@drawable/abc"
      android:layout_centerVertical="true"
      android:layout_centerHorizontal="true" />
      
   <Button
      android:layout_width="wrap_content"
      android:layout_height="wrap_content"
      android:id="@+id/button2"
      android:text="Broadcast Intent"
      android:onClick="broadcastIntent"
      android:layout_below="@+id/imageButton"
      android:layout_centerHorizontal="true" />

</RelativeLayout>

Let’s try to run our modified Hello World! application we just modified. I assume you had created your AVD while doing environment set-up. To run the app from Android studio, open one of your project’s activity files and click Run Eclipse Run Icon icon from the tool bar. Android Studio installs the app on your AVD and starts it and if everything is fine with your set-up and application, it will display following Emulator window −


Now to broadcast our custom intent, let’s click on Broadcast Intent button, this will broadcast our custom intent “com.tutorialspoint.CUSTOM_INTENT” which will be intercepted by our registered BroadcastReceiver i.e. MyReceiver and as per our implemented logic a toast will appear on the bottom of the the simulator as follows −


You can try implementing other BroadcastReceiver to intercept system generated intents like system boot up, date changed, low battery etc.


Android – Services

service is a component that runs in the background to perform long-running operations without needing to interact with the user and it works even if application is destroyed. A service can essentially take two states −

Sr.No.State & Description
1Started

A service is started when an application component, such as an activity, starts it by calling startService(). Once started, a service can run in the background indefinitely, even if the component that started it is destroyed.

2Bound

A service is bound when an application component binds to it by calling bindService(). A bound service offers a client-server interface that allows components to interact with the service, send requests, get results, and even do so across processes with interprocess communication (IPC).

A service has life cycle callback methods that you can implement to monitor changes in the service’s state and you can perform work at the appropriate stage. The following diagram on the left shows the life cycle when the service is created with startService() and the diagram on the right shows the life cycle when the service is created with bindService(): (image courtesy : android.com )

Android Service lifecycle

To create an service, you create a Java class that extends the Service base class or one of its existing subclasses. The Service base class defines various callback methods and the most important are given below. You don’t need to implement all the callbacks methods. However, it’s important that you understand each one and implement those that ensure your app behaves the way users expect.

Sr.No.Callback & Description
1onStartCommand()

The system calls this method when another component, such as an activity, requests that the service be started, by calling startService(). If you implement this method, it is your responsibility to stop the service when its work is done, by calling stopSelf() or stopService() methods.

2onBind()

The system calls this method when another component wants to bind with the service by calling bindService(). If you implement this method, you must provide an interface that clients use to communicate with the service, by returning an IBinder object. You must always implement this method, but if you don’t want to allow binding, then you should return null.

3onUnbind()

The system calls this method when all clients have disconnected from a particular interface published by the service.

4onRebind()

The system calls this method when new clients have connected to the service, after it had previously been notified that all had disconnected in its onUnbind(Intent).

5onCreate()

The system calls this method when the service is first created using onStartCommand() or onBind(). This call is required to perform one-time set-up.

6onDestroy()

The system calls this method when the service is no longer used and is being destroyed. Your service should implement this to clean up any resources such as threads, registered listeners, receivers, etc.

The following skeleton service demonstrates each of the life cycle methods −

package com.tutorialspoint;

import android.app.Service;
import android.os.IBinder;
import android.content.Intent;
import android.os.Bundle;

public class HelloService extends Service {
   
   /** indicates how to behave if the service is killed */
   int mStartMode;
   
   /** interface for clients that bind */
   IBinder mBinder;     
   
   /** indicates whether onRebind should be used */
   boolean mAllowRebind;

   /** Called when the service is being created. */
   @Override
   public void onCreate() {
     
   }

   /** The service is starting, due to a call to startService() */
   @Override
   public int onStartCommand(Intent intent, int flags, int startId) {
      return mStartMode;
   }

   /** A client is binding to the service with bindService() */
   @Override
   public IBinder onBind(Intent intent) {
      return mBinder;
   }

   /** Called when all clients have unbound with unbindService() */
   @Override
   public boolean onUnbind(Intent intent) {
      return mAllowRebind;
   }

   /** Called when a client is binding to the service with bindService()*/
   @Override
   public void onRebind(Intent intent) {

   }

   /** Called when The service is no longer used and is being destroyed */
   @Override
   public void onDestroy() {

   }
}

Example

This example will take you through simple steps to show how to create your own Android Service. Follow the following steps to modify the Android application we created in Hello World Example chapter −

StepDescription
1You will use Android StudioIDE to create an Android application and name it as My Application under a package com.example.tutorialspoint7.myapplication as explained in the Hello World Example chapter.
2Modify main activity file MainActivity.java to add startService() and stopService() methods.
3Create a new java file MyService.java under the package com.example.My Application. This file will have implementation of Android service related methods.
4Define your service in AndroidManifest.xml file using <service…/> tag. An application can have one or more services without any restrictions.
5Modify the default content of res/layout/activity_main.xml file to include two buttons in linear layout.
6No need to change any constants in res/values/strings.xml file. Android studio take care of string values
7Run the application to launch Android emulator and verify the result of the changes done in the application.

Following is the content of the modified main activity file MainActivity.java. This file can include each of the fundamental life cycle methods. We have added startService() and stopService() methods to start and stop the service.

package com.example.tutorialspoint7.myapplication;

import android.content.Intent;
import android.support.v7.app.AppCompatActivity;
import android.os.Bundle;

import android.os.Bundle;
import android.app.Activity;
import android.util.Log;
import android.view.View;

public class MainActivity extends Activity {
   String msg = "Android : ";

   /** Called when the activity is first created. */
   @Override
   public void onCreate(Bundle savedInstanceState) {
      super.onCreate(savedInstanceState);
      setContentView(R.layout.activity_main);
      Log.d(msg, "The onCreate() event");
   }

   public void startService(View view) {
      startService(new Intent(getBaseContext(), MyService.class));
   }

   // Method to stop the service
   public void stopService(View view) {
      stopService(new Intent(getBaseContext(), MyService.class));
   }
}

Following is the content of MyService.java. This file can have implementation of one or more methods associated with Service based on requirements. For now we are going to implement only two methods onStartCommand() and onDestroy() −

package com.example.tutorialspoint7.myapplication;

import android.app.Service;
import android.content.Intent;
import android.os.IBinder;
import android.support.annotation.Nullable;
import android.widget.Toast;

/**
   * Created by TutorialsPoint7 on 8/23/2016.
*/

public class MyService extends Service {
   @Nullable
   @Override
   public IBinder onBind(Intent intent) {
      return null;
   }
	
   @Override
   public int onStartCommand(Intent intent, int flags, int startId) {
      // Let it continue running until it is stopped.
      Toast.makeText(this, "Service Started", Toast.LENGTH_LONG).show();
      return START_STICKY;
   }

   @Override
   public void onDestroy() {
      super.onDestroy();
      Toast.makeText(this, "Service Destroyed", Toast.LENGTH_LONG).show();
   }
}

Following will the modified content of AndroidManifest.xml file. Here we have added <service…/> tag to include our service −

<?xml version="1.0" encoding="utf-8"?>
<manifest xmlns:android="http://schemas.android.com/apk/res/android"
   package="com.example.tutorialspoint7.myapplication">

   <application
      android:allowBackup="true"
      android:icon="@mipmap/ic_launcher"
      android:label="@string/app_name"
      android:supportsRtl="true"
      android:theme="@style/AppTheme">
		
      <activity android:name=".MainActivity">
         <intent-filter>
            <action android:name="android.intent.action.MAIN" />

            <category android:name="android.intent.category.LAUNCHER" />
         </intent-filter>
      </activity>
		
      <service android:name=".MyService" />
   </application>

</manifest>

Following will be the content of res/layout/activity_main.xml file to include two buttons −

<RelativeLayout xmlns:android="http://schemas.android.com/apk/res/android"
   xmlns:tools="http://schemas.android.com/tools" android:layout_width="match_parent"
   android:layout_height="match_parent" android:paddingLeft="@dimen/activity_horizontal_margin"
   android:paddingRight="@dimen/activity_horizontal_margin"
   android:paddingTop="@dimen/activity_vertical_margin"
   android:paddingBottom="@dimen/activity_vertical_margin" tools:context=".MainActivity">
   
   <TextView
      android:id="@+id/textView1"
      android:layout_width="wrap_content"
      android:layout_height="wrap_content"
      android:text="Example of services"
      android:layout_alignParentTop="true"
      android:layout_centerHorizontal="true"
      android:textSize="30dp" />
      
   <TextView
      android:id="@+id/textView2"
      android:layout_width="wrap_content"
      android:layout_height="wrap_content"
      android:text="Tutorials point "
      android:textColor="#ff87ff09"
      android:textSize="30dp"
      android:layout_above="@+id/imageButton"
      android:layout_centerHorizontal="true"
      android:layout_marginBottom="40dp" />

   <ImageButton
      android:layout_width="wrap_content"
      android:layout_height="wrap_content"
      android:id="@+id/imageButton"
      android:src="@drawable/abc"
      android:layout_centerVertical="true"
      android:layout_centerHorizontal="true" />

   <Button
      android:layout_width="wrap_content"
      android:layout_height="wrap_content"
      android:id="@+id/button2"
      android:text="Start Services"
      android:onClick="startService"
      android:layout_below="@+id/imageButton"
      android:layout_centerHorizontal="true" />

   <Button
      android:layout_width="wrap_content"
      android:layout_height="wrap_content"
      android:text="Stop Services"
      android:id="@+id/button"
      android:onClick="stopService"
      android:layout_below="@+id/button2"
      android:layout_alignLeft="@+id/button2"
      android:layout_alignStart="@+id/button2"
      android:layout_alignRight="@+id/button2"
      android:layout_alignEnd="@+id/button2" />

</RelativeLayout>

Featured post

Calculator Android Application | #Android_Studio #Project

Calculator Android Application | #Android_Studio #Project A calculator is a device that performs arithmetic operations on numbers. This App ...

Popular Posts

Stay Tuned

Connect on Facebook

Subscribe on YouTube

About this Site

I have come up with this website to share what I do and what I am. Therefore, I invite you to go through this website to understand my work and also services that I provide.